> ## Documentation Index
> Fetch the complete documentation index at: https://cobo.com/payments/llms.txt
> Use this file to discover all available pages before exploring further.
# Preparation for development environment
**Disclaimer: This article contains AI translations and should only be used as reference.** Contact Cobo's support team through [help@cobo.com](mailto:help@cobo.com) if you have any questions.
This document introduces how to complete the preparatory work before integrating payment features in the development environment, helping you verify functions and ensure normal integration operation.
**Next steps:**
After completing development environment verification, when you are ready to deploy payment features to the production environment, refer to [Preparation for production environment](/payments/en/guides/preparation-prod) for related guidance.
## Prerequisites
* [Contact our sales team](https://calendly.com/d/cngv-d6n-rhs) to obtain your account activation link.
* An iOS device for running [Cobo Guard](https://manuals.cobo.com/en/guard/introduction), which is our dedicated application for multi-factor authentication (MFA), operation approval, transaction signing, and key share management.
## Basic preparation
### Create account and set up Cobo Guard
As the first admin of your team, please use the activation link provided by our sales team to create your Cobo Portal development environment account. After creation, please follow these steps to set up Cobo Guard:
1. Log in to Cobo Portal [development environment](https://portal.dev.cobo.com/login).
2. Click **Guide** in the lower left corner, then click **Bind Cobo Guard**.
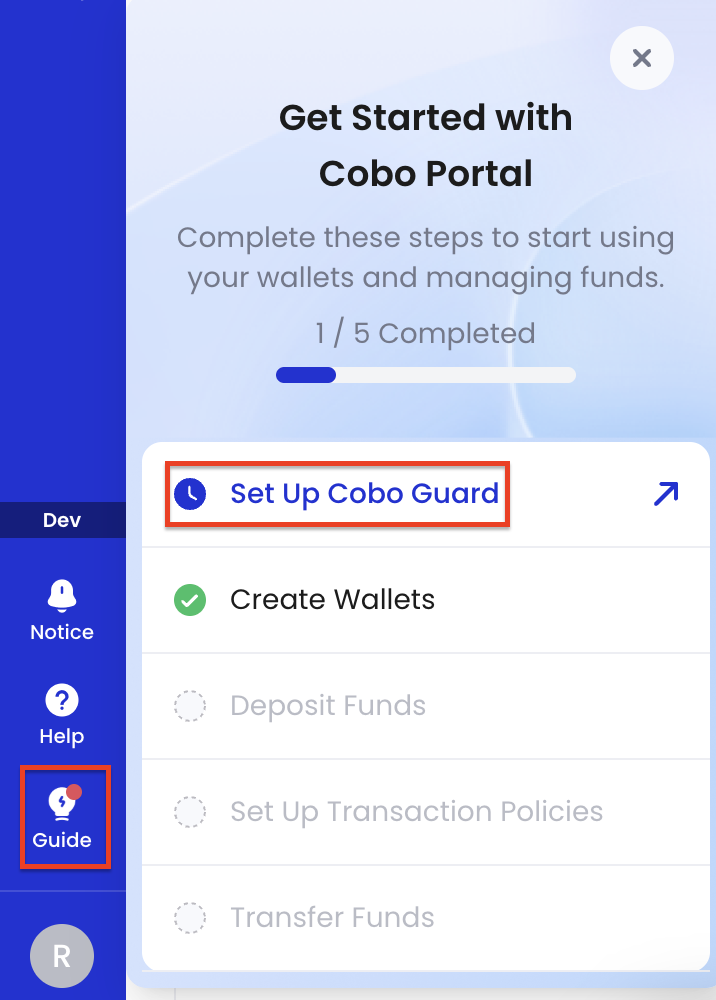 3. Follow the on-screen instructions to install Cobo Guard on your iOS device and associate your account with Cobo Guard.
### Invite members
1. Log in to Cobo Portal [development environment](https://portal.dev.cobo.com/login).
2. Click the profile icon in the lower left corner, then click **Team**.
3. Click **Members**. On the **Members** page, click **Invite Member**.
4. Enter the member's email address and name, then select the appropriate [user role](/payments/en/guides/roles-and-permissions).
Please confirm on Cobo Guard that this invitation was initiated by you. Additionally, according to the default business risk control rules, at least half of the team admins need to approve the invitation request on Cobo Guard.
After receiving the invitation, new members should create their own accounts and set up Cobo Guard as described in the previous section.
### Install Payments App
Payments App provides a web interface that allows you to conveniently perform daily operations such as payment collection queries, fund management, and payouts. Installation steps are as follows:
1. Log in to Cobo Portal [development environment](https://portal.dev.cobo.com/login).
2. On the homepage, click the **Payments** card.
3. Follow the on-screen instructions to install Cobo Guard on your iOS device and associate your account with Cobo Guard.
### Invite members
1. Log in to Cobo Portal [development environment](https://portal.dev.cobo.com/login).
2. Click the profile icon in the lower left corner, then click **Team**.
3. Click **Members**. On the **Members** page, click **Invite Member**.
4. Enter the member's email address and name, then select the appropriate [user role](/payments/en/guides/roles-and-permissions).
Please confirm on Cobo Guard that this invitation was initiated by you. Additionally, according to the default business risk control rules, at least half of the team admins need to approve the invitation request on Cobo Guard.
After receiving the invitation, new members should create their own accounts and set up Cobo Guard as described in the previous section.
### Install Payments App
Payments App provides a web interface that allows you to conveniently perform daily operations such as payment collection queries, fund management, and payouts. Installation steps are as follows:
1. Log in to Cobo Portal [development environment](https://portal.dev.cobo.com/login).
2. On the homepage, click the **Payments** card.
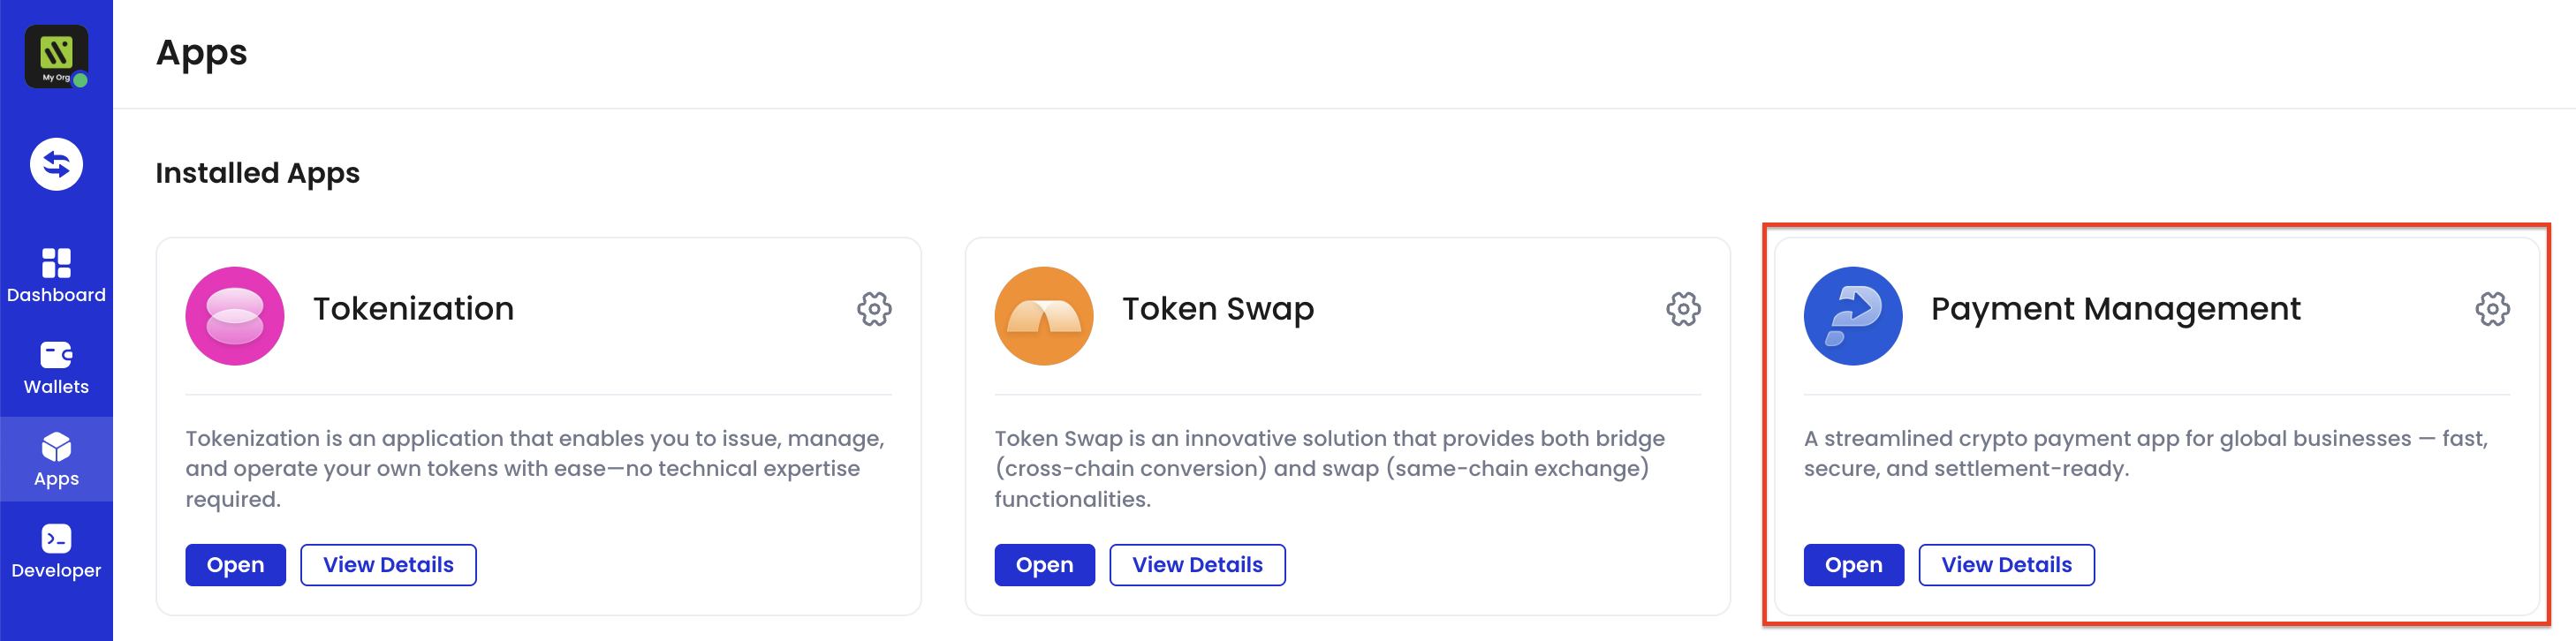 3. Click the **Install** button and follow the on-page instructions to complete installation. For **Wallet scope**, select **Any wallet type**.
4. If the page prompts that admin approval is needed, please notify the admin to approve on Cobo Guard. After approval, the App will automatically complete installation.
## Technical configuration
### Payments API calling preparation
If you need to call Payments API, you need to follow these steps to complete API key configuration.
1. Refer to the [Developer guide](/payments/en/developer-tools/get-started-with-api) to generate an API key and API secret pair, and register the API key in Cobo Portal. Please note the following configurations:
* **User role**: Select **Payment admin**
* **Wallet scope**: Select **Any wallet type**
* **Key type**: Select **Temporary**
2. If you choose to use an SDK instead of manually writing API requests, you need to install the SDK for the corresponding programming language:
* [Python SDK quickstart](/payments/en/developer-tools/quickstart-python)
* [Java SDK quickstart](/payments/en/developer-tools/quickstart-java)
* [Go SDK quickstart](/payments/en/developer-tools/quickstart-go)
* [JavaScript SDK quickstart](/payments/en/developer-tools/quickstart-javascript)
### Subscribe to webhook events
If you need to receive real-time notifications of payment-related events, you can set up and register a webhook endpoint to receive webhook events. Specific steps are as follows:
* Refer to the [Developer guide](/payments/en/developer-tools/set-up-endpoint) to set up a webhook endpoint.
* [Register the webhook endpoint](https://manuals.cobo.com/en/portal/developer-console/webhooks-create) in Cobo Portal and subscribe to [payment-related webhook events](/payments/en/guides/status-and-events).
## Business configuration
### Top up Fee Station
During your daily business operations, you need to manage various fees incurred on Cobo through [Fee Station](https://manuals.cobo.com/en/portal/fee-station/introduction). Before you start integration, please ensure that you have sufficient funds in your Fee Station to pay for fees generated during payouts, refunds, and other processes:
* You can use USDT or USDC as the fee token
* The recommended initial top-up amount is equivalent to approximately 50 USD in cryptocurrency. You can adjust the top-up amount based on actual business needs.
For specific top-up operation steps, refer to the [Top up Fee Station](https://manuals.cobo.com/en/portal/fee-station/deposit) document.
## Next steps
Refer to the [Feature list](/payments/en/guides/features#pay-ins) to select the pay-in mode suitable for you and refer to the documentation to complete payment collection feature integration.
3. Click the **Install** button and follow the on-page instructions to complete installation. For **Wallet scope**, select **Any wallet type**.
4. If the page prompts that admin approval is needed, please notify the admin to approve on Cobo Guard. After approval, the App will automatically complete installation.
## Technical configuration
### Payments API calling preparation
If you need to call Payments API, you need to follow these steps to complete API key configuration.
1. Refer to the [Developer guide](/payments/en/developer-tools/get-started-with-api) to generate an API key and API secret pair, and register the API key in Cobo Portal. Please note the following configurations:
* **User role**: Select **Payment admin**
* **Wallet scope**: Select **Any wallet type**
* **Key type**: Select **Temporary**
2. If you choose to use an SDK instead of manually writing API requests, you need to install the SDK for the corresponding programming language:
* [Python SDK quickstart](/payments/en/developer-tools/quickstart-python)
* [Java SDK quickstart](/payments/en/developer-tools/quickstart-java)
* [Go SDK quickstart](/payments/en/developer-tools/quickstart-go)
* [JavaScript SDK quickstart](/payments/en/developer-tools/quickstart-javascript)
### Subscribe to webhook events
If you need to receive real-time notifications of payment-related events, you can set up and register a webhook endpoint to receive webhook events. Specific steps are as follows:
* Refer to the [Developer guide](/payments/en/developer-tools/set-up-endpoint) to set up a webhook endpoint.
* [Register the webhook endpoint](https://manuals.cobo.com/en/portal/developer-console/webhooks-create) in Cobo Portal and subscribe to [payment-related webhook events](/payments/en/guides/status-and-events).
## Business configuration
### Top up Fee Station
During your daily business operations, you need to manage various fees incurred on Cobo through [Fee Station](https://manuals.cobo.com/en/portal/fee-station/introduction). Before you start integration, please ensure that you have sufficient funds in your Fee Station to pay for fees generated during payouts, refunds, and other processes:
* You can use USDT or USDC as the fee token
* The recommended initial top-up amount is equivalent to approximately 50 USD in cryptocurrency. You can adjust the top-up amount based on actual business needs.
For specific top-up operation steps, refer to the [Top up Fee Station](https://manuals.cobo.com/en/portal/fee-station/deposit) document.
## Next steps
Refer to the [Feature list](/payments/en/guides/features#pay-ins) to select the pay-in mode suitable for you and refer to the documentation to complete payment collection feature integration.